We’ve all been there – staring at hundreds of beautiful wedding photos wondering how to transform them from digital files into stunning displays that capture those precious memories. Your wedding day deserves more than just sitting in a phone gallery or forgotten on a hard drive.
Creative photo displays can turn your favorite moments into breathtaking focal points throughout your home. From elegant gallery walls to innovative shadow boxes we’ll show you how to showcase your love story in ways that’ll make every guest stop and admire.
Whether you’re working with a tight budget or ready to splurge on custom pieces there’s a perfect display solution waiting for your unique style. We’ve gathered the most inspiring and practical ideas that’ll help you create lasting tributes to your special day – no design experience required.
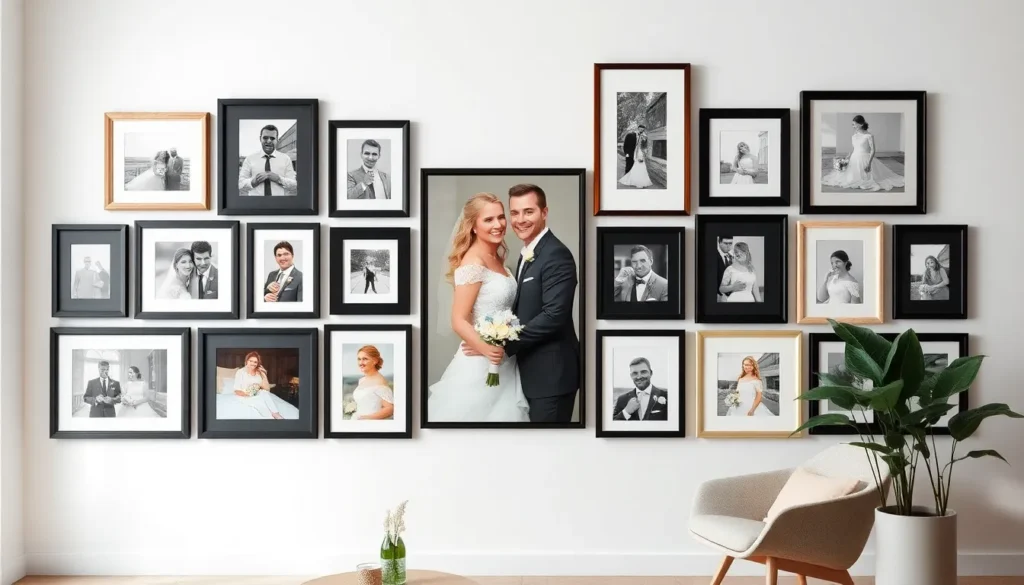
Create a Stunning Gallery Wall with Mixed Frame Sizes
Mixed frame sizes transform your wedding photos into an eye-catching focal point that draws guests into your love story. We’ll show you how to create professional-looking arrangements that celebrate your special day.
Choose Complementary Frame Colors and Materials
Black and white frames create a timeless foundation that lets your wedding photos take center stage. We recommend mixing matte black with crisp white frames for a classic look that works in any room. Metallic accents like gold, silver, or rose gold add warmth and elegance to your display.
Wood frames bring natural texture and warmth to your gallery wall. Choose frames in matching wood tones like walnut, oak, or pine for a cohesive appearance. Mixing different wood stains creates visual depth while maintaining an organic feel.
Material combinations work beautifully when you stick to a consistent color palette. Pair metal frames with wooden ones in similar tones, or combine different textures like smooth acrylic with traditional wood. Limit yourself to 2-3 frame materials to avoid a cluttered appearance.
Arrange Photos in a Balanced Layout Pattern
Start with your largest photo as the anchor point and build around it. Place your most important wedding photo like the ceremony kiss or first dance in the center or slightly off-center. This creates a natural focal point that guides the viewer’s eye through your display.
Use the triangle rule to create visual balance across your gallery wall. Imagine invisible triangles connecting your photos and distribute similar-sized frames evenly throughout the arrangement. This prevents one area from feeling too heavy or sparse.
Maintain consistent spacing between frames for a polished look. We suggest keeping 2-3 inches between each frame regardless of size. Cut paper templates matching your frame sizes and tape them to the wall first to perfect your layout before hanging.
Include Different Photo Sizes for Visual Interest
Large statement pieces showcase your most breathtaking wedding moments. Use 11×14 or 16×20 inch frames for dramatic shots like your venue’s architecture, group family photos, or sweeping ceremony views. These larger photos create powerful visual anchors in your arrangement.
Medium-sized photos fill the middle ground and provide storytelling opportunities. 8×10 and 5×7 inch frames work perfectly for candid moments, detail shots of your rings or bouquet, and intimate couple portraits. These sizes offer flexibility in your layout design.
Small accent photos add personality and complete your visual story. Use 4×6 or 5×5 inch frames for fun reception moments, getting-ready shots, or close-up details. These smaller frames create rhythm and movement throughout your gallery wall while showcasing those precious little moments.
Design a Romantic Photo Timeline Display

Creating a photo timeline transforms your wedding memories into a beautiful narrative that guests can follow from start to finish. This display method tells your love story chronologically while adding visual interest to your reception space.
Chronologically Arrange Photos from Engagement to Reception
Start your timeline with engagement photos that capture the excitement of your proposal moment. Follow these with candid shots from wedding preparations like getting ready, hair and makeup sessions, and intimate moments with your wedding party. Next, showcase ceremony highlights including the processional, exchanging vows, ring ceremony, and your first kiss as a married couple.
Complete the timeline with reception memories featuring your grand entrance, first dance, cake cutting, and celebration moments with family and friends. This chronological arrangement creates a natural flow that helps guests relive your special day alongside you. We recommend selecting 15-20 key photos that represent each phase of your wedding journey to maintain visual balance without overwhelming viewers.
Use String Lights to Enhance the Timeline Effect
String lights create a warm ambiance that perfectly complements your photo timeline display. Hang warm white LED lights above your photo arrangement to cast a romantic glow over the entire display. Alternatively, weave fairy lights through and around your photos to create depth and visual interest.
Consider using battery-operated string lights for flexibility in placement and to avoid cord management issues. Copper wire lights work particularly well because they’re nearly invisible and bend easily around photo frames. The soft illumination from string lights makes your photos more inviting and encourages guests to spend time viewing your timeline display.
Add Milestone Markers Between Photo Groupings
Include decorative markers or signs to highlight important moments throughout your relationship timeline. Create elegant labels for key milestones such as “First Date,” “The Proposal,” “Engagement Party,” and “Wedding Day” using calligraphy or printed signs that match your wedding theme.
Position these markers between photo groupings to provide context and help guests understand the progression of your love story. We suggest using materials like wooden signs for rustic weddings, acrylic for modern celebrations, or vintage-style frames for classic themes. These milestone markers add depth to your timeline while creating natural breaks that make the display easier to follow and more captivating for your guests.
Build a Custom Wedding Photo Shadow Box

Shadow boxes create three-dimensional wedding displays that preserve your precious memories alongside tangible keepsakes from your special day. These elegant displays transform flat photos into storytelling pieces that capture the full essence of your wedding celebration.
Layer Photos with Meaningful Wedding Keepsakes
Creating depth in your shadow box starts with carefully layering photos behind meaningful objects from your wedding day. Place larger photos as the backdrop and position smaller ones in front using foam spacers to create visual dimension.
Wedding jewelry makes beautiful focal points when arranged alongside your favorite ceremony photos. Position your engagement ring, wedding bands, or special family heirlooms in small display cases within the shadow box. Earrings can be mounted on small fabric-covered boards that complement your photo colors.
Reception keepsakes add personal touches that tell your complete wedding story. Include items like cake toppers, place cards with your names, or small wedding favors that guests received. Menu cards from your reception dinner create elegant layering elements when positioned behind portrait photos.
Fabric swatches from your dress or the wedding party attire provide texture and color coordination. Cut small pieces of lace, satin, or other wedding fabrics to use as backing for photos or as decorative elements throughout the display.
Include Dried Flowers from Your Bouquet
Preserving flowers from your bridal bouquet creates lasting memories that maintain their sentimental value for years to come. Press individual petals and smaller blooms between heavy books for 2-3 weeks before adding them to your shadow box design.
Larger flower heads can be air-dried by hanging them upside down in a dark, dry location for several weeks. Once completely dried, these flowers become stunning focal points when positioned around your favorite wedding photos.
Boutonniere flowers from the groom and groomsmen add masculine elements to balance the display. These smaller arrangements dry quickly and fit perfectly in corner spaces or as accent pieces between photo groupings.
Baby’s breath and greenery from your arrangements create delicate framing elements around photos. Scatter these dried pieces throughout the shadow box to create visual flow and connect different sections of your display.
Add Personal Touches Like Vows or Song Lyrics
Handwritten vows become treasured keepsakes when beautifully incorporated into your wedding photo shadow box. Print or carefully write your vows on high-quality paper that matches your wedding color scheme, then roll them into scrolls tied with ribbon.
Song lyrics from your first dance create romantic focal points that complement your reception photos. Choose meaningful lines that capture your relationship and print them in elegant fonts on cardstock or parchment paper.
Love letters exchanged before your wedding add intimate storytelling elements to your display. Fold these letters and position them behind photos where glimpses of your handwriting become visible, creating layers of personal history.
Wedding invitation elements like RSVP cards, envelope liners, or decorative borders can be cut and used as framing elements around smaller photos. These coordinated pieces tie your shadow box design back to your original wedding aesthetic and create visual cohesion throughout the display.
Transform Photos into Canvas Art Pieces

Canvas art pieces elevate wedding photos from simple prints to sophisticated home décor elements. We’ll explore how professional canvas displays create lasting impressions that complement your interior design.
Select High-Resolution Images for Professional Printing
Resolution matters significantly when transforming digital photos into canvas masterpieces. Wedding photographers typically provide images at 300 DPI (dots per inch), which ensures crisp, detailed prints without pixelation or blurriness.
Professional printing services require exact file formats for optimal results. JPEG files work well for most canvas projects, while TIFF files offer superior quality for large-format prints. We recommend requesting high-resolution originals from your photographer rather than using social media downloads.
Image editing enhances canvas print quality before professional production. Color correction, brightness adjustments, and sharpening filters improve the final canvas appearance. Most professional printing companies offer basic editing services, though we suggest reviewing proofs before final production.
Choose Canvas Sizes That Complement Your Room
Room dimensions determine appropriate canvas sizing for balanced visual impact. Large living rooms accommodate statement pieces measuring 24×36 inches or larger, while intimate spaces work better with 16×20 inch canvases. We measure wall space before selecting canvas dimensions to ensure proper proportions.
Ceiling height influences canvas orientation and size selection. Vertical canvases complement high ceilings and narrow wall spaces, while horizontal orientations suit standard ceiling heights. Square formats work well in modern spaces with clean architectural lines.
Furniture placement affects optimal canvas positioning and sizing. We position canvases 6-8 inches above furniture pieces like sofas or console tables. Multiple smaller canvases create gallery-style arrangements, while single large pieces serve as focal points above mantels or beds.
Create a Cohesive Color Scheme Across Multiple Canvases
Color coordination unifies multiple canvas displays throughout your home. We analyze existing room colors and select wedding photos that complement or enhance your décor palette. Neutral wedding photos blend seamlessly with various interior styles, while colorful ceremony shots add vibrant accents.
Photo editing achieves consistent color tones across different wedding moments. Professional editors adjust white balance, saturation, and contrast to create visual harmony between ceremony, reception, and portrait images. We recommend working with printing services that offer color matching across multiple canvas orders.
Frame coordination completes the cohesive canvas art collection. Black frames create classic, timeless looks that work with any décor style. Natural wood frames complement rustic or farmhouse interiors, while metallic frames add glamour to contemporary spaces. We suggest ordering all canvases simultaneously to ensure consistent frame finishes and canvas textures.
Craft a Unique Photo Album Coffee Table Display

Transforming your wedding photos into a stunning coffee table centerpiece creates an intimate viewing experience that celebrates your love story. We’ll guide you through creating a sophisticated display using Layflat Photo Albums with ultra-thick pages that lay completely flat when opened.
Design a Layered Coffee Table Book Arrangement
Stack multiple photo albums of varying sizes to create visual depth and interest on your coffee table surface. We recommend arranging three to four albums with the largest book as your foundation and progressively smaller albums layered on top.
Choose albums with complementary cover designs and colors that harmonize with your existing décor scheme. Metallic covers paired with neutral tones create an elegant foundation, while leather-bound albums offer timeless sophistication.
Arrange the albums at slight angles rather than perfectly aligned to create ever-changing visual movement. Position each book so that portions of the lower albums remain visible, showcasing their beautiful cover designs and creating layers of visual texture.
Select albums that vary in thickness to add dimensional interest to your arrangement. Wedding albums, engagement photo books, and smaller memory books work together to tell your complete love story through varying heights and proportions.
Include Smaller Framed Photos Around the Albums
Place 4×6 or 5×7 framed photos strategically around your album arrangement to create a cohesive photo vignette. We suggest choosing frames that echo the materials and finishes found in your album covers for visual continuity.
Position smaller framed images at different heights using decorative stands or small easels to add vertical dimension. Candid moments from your wedding day work beautifully as these accent pieces, complementing the formal portraits typically featured in your main albums.
Select photos that capture different aspects of your wedding celebration, such as detail shots of rings, bouquets, or reception décor. These intimate images provide visual variety and create conversation starters for guests browsing your display.
Limit your framed photo selection to three to five pieces to avoid overwhelming the arrangement. Too many small frames can create visual clutter that detracts from the beauty of your carefully curated album display.
Add Decorative Elements That Match Your Home Décor
Incorporate vases, candles, or small sculptural objects that reflect your personal style and existing home décor palette. We recommend choosing decorative elements in materials that complement your album covers, such as brass accents with gold-toned albums or ceramic pieces with neutral covers.
Position decorative elements at varying heights to create visual rhythm throughout your coffee table arrangement. Tall vases or candlesticks provide vertical interest, while smaller objects like decorative boxes or crystals add intimate detail at table level.
Include fresh flowers or greenery in small vessels to bring life and color to your display. Seasonal blooms or simple eucalyptus branches create natural beauty that enhances rather than competes with your precious wedding memories.
Choose decorative pieces that serve dual purposes, such as small bowls for jewelry or decorative boxes for storing additional photos. Functional décor elements maintain the clean, organized appearance essential for an elegant coffee table display while providing practical storage answers.
Create Digital Photo Displays with Smart Frames

Smart frames revolutionize how we showcase our wedding memories by combining traditional photo displays with modern technology. These innovative devices allow us to create ever-changing, ever-changing presentations of our most treasured moments.
Upload and Rotate Your Favorite Wedding Photos
Smart frames make uploading our wedding photos effortless through WiFi connectivity and mobile apps. We can transfer hundreds of images directly from our phones or computers without any physical storage limitations. Most smart frames support various file formats including JPEG and PNG, ensuring our high-quality wedding photos maintain their clarity and vibrancy.
Rotation features automatically cycle through our curated collection, displaying different photos throughout the day. We can set custom intervals ranging from every few minutes to several hours, creating fresh viewing experiences each time we pass by. This functionality ensures our ceremony highlights, reception moments, and couple portraits all receive equal attention without manual intervention.
Advanced smart frames offer organization capabilities that let us create themed folders for different wedding events. We can separate our engagement photos, getting-ready shots, ceremony images, and reception memories into distinct categories. The device randomly selects from these collections, maintaining visual interest while preserving the chronological flow of our special day.
Set Up Slideshow Features for Ever-changing Viewing
Slideshow configurations transform static displays into captivating visual storytelling experiences. We can customize transition effects between photos, choosing from fade, slide, or zoom animations that complement our home’s aesthetic. These smooth transitions create cinematic presentations that draw viewers into our wedding narrative.
Timing controls allow us to adjust how long each photo displays before transitioning to the next image. Quick intervals of 10-15 seconds work well for casual viewing areas, while longer durations of 30-60 seconds suit intimate spaces where guests linger. We can also pause the slideshow on particularly meaningful moments during gatherings or celebrations.
Many smart frames include music integration capabilities that sync our wedding playlist with the photo slideshow. Background audio featuring our first dance song or ceremony music creates immersive experiences that transport viewers back to our wedding day. Volume controls ensure the audio complements rather than overwhelms the visual display.
Share Access with Family Members Remotely
Remote sharing capabilities enable our loved ones to contribute their own wedding photos to our smart frame display. We can grant access permissions to family members and friends through dedicated mobile apps, allowing them to upload candid shots and behind-the-scenes moments we might have missed. This collaborative approach creates comprehensive wedding photo collections that capture multiple perspectives.
Cloud synchronization ensures our frame automatically updates when new photos are added from anywhere in the industry. Grandparents living across the country can share their favorite ceremony moments, while wedding party members can contribute reception highlights. These additions appear seamlessly in our rotation without requiring manual uploads or physical transfers.
Privacy controls let us moderate incoming photos before they appear in our display rotation. We can review and approve submissions to maintain our desired aesthetic and content standards. Email notifications alert us when new photos arrive, giving us control over our display while encouraging family participation in preserving our wedding memories.
Design Themed Photo Displays by Wedding Moments

We love organizing wedding photos by their special moments to create meaningful displays that tell your complete love story. Different wedding moments deserve unique presentation styles that highlight their significance.
Group Ceremony Photos in One Display Area
Wooden photo walls create stunning backdrops for displaying your ceremony moments in one cohesive space. We recommend using reclaimed wood or natural timber to match rustic outdoor wedding themes perfectly. Position your ceremony photos at eye level for easy viewing by guests during cocktail hour.
Hanging bouquet charms offer a creative alternative for showcasing ceremony highlights in an elegant floating display. Attach small ceremony photos to delicate charms that dangle at varying heights from a decorative branch or vintage ladder. This approach works exceptionally well for intimate gatherings where guests can interact closely with your displayed memories.
Gallery style arrangements allow you to group multiple ceremony photos together while maintaining visual balance through consistent frame styles. Choose frames in matching materials like brushed gold or matte black to create unity across your ceremony photo collection.
Create Separate Reception Photo Collections
Table numbers featuring photos transform functional seating arrangements into personalized memory displays throughout your reception space. We suggest using engagement photos or childhood pictures of the couple for each table number to spark conversations among guests. Print photos on sturdy cardstock or mount them on elegant stands that complement your wedding décor.
Photo incorporated centerpieces add personal touches to each reception table while creating intimate viewing opportunities for seated guests. Layer reception photos around floral arrangements or candles to create depth and visual interest. Consider using different photo sizes within each centerpiece to maintain ever-changing visual flow.
Timeline reception displays showcase the progression of your celebration from first dance to final send off moments. Arrange reception photos chronologically along a designated wall space or hallway where guests naturally pass during the evening festivities.
Showcase Candid Moments in Informal Settings
Polaroid picture stations encourage guest interaction while creating instant keepsakes for your candid photo collection. Set up vintage Polaroid cameras with film supplies and decorative baskets where guests can leave their spontaneous shots for you to discover later. This interactive element generates authentic candid moments that capture genuine emotions and reactions.
Insta collages using grid displays present multiple candid photos in organized arrangements that create visual impact through collective storytelling. Mount candid shots on boards or easels using consistent spacing to maintain clean lines while allowing individual photos to shine. We recommend using 20 to 30 candid photos per grid to achieve optimal visual density.
Casual photo corners throughout your venue create relaxed spaces where candid moments can be displayed without formal presentation requirements. Use clipboards, twine lines, or magnetic boards to showcase spontaneous photos that capture the authentic spirit of your celebration day.
Incorporate Photos into Functional Home Decor

Transform your wedding memories into practical pieces that blend seamlessly with your daily life. These functional displays ensure your favorite moments remain visible while serving a purpose in your home.
Design Custom Photo Coasters and Placemats
Custom photo coasters bring wedding memories to every meal and gathering. Choose high-resolution images from your ceremony and reception to create durable cork or ceramic coasters that protect surfaces while sparking conversations. Select photos with strong contrast and clear focal points to ensure they remain visible even when glasses rest on top.
Photo placemats offer a larger canvas for storytelling during dinner parties. Create a cohesive set featuring different moments from your wedding day, such as your first dance, cake cutting, and family portraits. Use laminated materials or waterproof printing to ensure your placemats withstand daily use and cleaning.
Mix and match coaster and placemat designs to create themed sets for different seasons or occasions. Consider creating multiple sets with varying photo arrangements to rotate throughout the year, keeping your dining experience fresh and captivating.
Create Photo-Embedded Serving Trays
Photo-embedded serving trays transform ordinary entertaining into memorable experiences. Choose rectangular or round trays with recessed centers to showcase your favorite wedding images while maintaining functionality for food and beverages. Wedding cake photos work particularly well for dessert trays, while reception candids enhance cocktail service.
Resin-sealed photo trays offer durability and water resistance for both indoor and outdoor entertaining. Select images with vibrant colors and emotional impact to create conversation starters during gatherings. Group photos featuring both families work exceptionally well for larger serving trays used during holiday celebrations.
Create themed serving sets by pairing multiple trays with complementary wedding moments. Consider combining ceremony photos with reception images to tell your love story through functional art pieces that guests can appreciate while dining.
Transform Images into Decorative Throw Pillows
Decorative throw pillows featuring wedding photos add personal touches to living spaces while maintaining comfort and style. Choose square or rectangular pillow formats that complement your existing furniture arrangements and color schemes. Black and white wedding photos often work best for throw pillows, creating timeless designs that won’t clash with changing decor.
Print photos on soft fabrics like cotton or linen blends to ensure comfort alongside visual appeal. Select images with clear subjects and minimal background clutter to maintain photo clarity when translated to fabric. Engagement photos and couple portraits typically work better than large group shots for pillow applications.
Arrange multiple photo pillows throughout your home to create cohesive design elements that tie rooms together. Vary pillow sizes and photo orientations to add visual interest while maintaining your wedding theme across different living spaces.
Conclusion
Your wedding photos deserve more than digital storage – they’re meant to be lived with and celebrated daily. We’ve explored countless ways to transform these precious memories into stunning displays that reflect your unique love story.
From elegant gallery walls to functional home décor pieces every option we’ve shared can be customized to your personal style and budget. Whether you prefer classic framed displays or innovative smart frame technology the key is choosing answers that bring you joy every time you see them.
Start with one display idea that speaks to you most and gradually build your wedding photo showcase throughout your home. Your love story deserves to be beautifully told and these creative displays ensure your most cherished moments remain front and center in your daily life.
Frequently Asked Questions
What are the best ways to display wedding photos at home?
The most effective ways include creating gallery walls with mixed frame sizes, designing romantic photo timeline displays, crafting custom shadow boxes, transforming photos into canvas art, and setting up coffee table photo album displays. Each method offers unique aesthetic appeal and allows you to showcase different aspects of your wedding memories.
How do I create a balanced gallery wall with wedding photos?
Start with a large anchor photo as your focal point, then arrange smaller photos around it using the triangle rule for visual balance. Mix different frame sizes and use complementary colors like black, white, and metallic frames for a timeless look, or choose wood frames for a natural aesthetic.
What should I include in a wedding photo shadow box?
Layer your photos with meaningful keepsakes like wedding jewelry, dried flowers from your bridal bouquet, handwritten vows, song lyrics, and wedding invitation elements. This creates a three-dimensional display that preserves both visual memories and tangible mementos from your special day.
How do I choose the right canvas size for wedding photos?
Select canvas sizes based on your room dimensions and furniture placement. Large statement pieces work well above sofas or beds, while medium-sized canvases suit hallways and smaller spaces. Ensure high-resolution images (300 DPI minimum) for the best print quality and visual impact.
What are smart frames and how can they display wedding photos?
Smart frames are digital devices that allow you to upload and rotate wedding photos effortlessly. They offer customizable slideshow features, music integration, and remote sharing capabilities, letting family members contribute photos while maintaining privacy controls for your desired aesthetic.
How can I incorporate wedding photos into functional home décor?
Create custom photo coasters and placemats for dining experiences, design photo-embedded serving trays for entertaining, and make decorative throw pillows featuring wedding photos. These functional items bring wedding memories into daily life while maintaining both style and practicality.
What’s the best way to organize wedding photos for display?
Group photos by special moments like ceremony, reception, and candid shots. Create cohesive areas using wooden photo walls for ceremony photos, incorporate table numbers with photos for reception memories, and set up casual photo corners for relaxed displays of spontaneous moments.
How do I create a romantic photo timeline display?
Arrange photos chronologically starting with engagement photos, then progress through wedding preparations, ceremony, and reception highlights. Use string lights for warm ambiance and add milestone markers between photo groupings to provide context and enhance the storytelling aspect of your display.